Why Understanding Ductless Mini Split Installation Matters
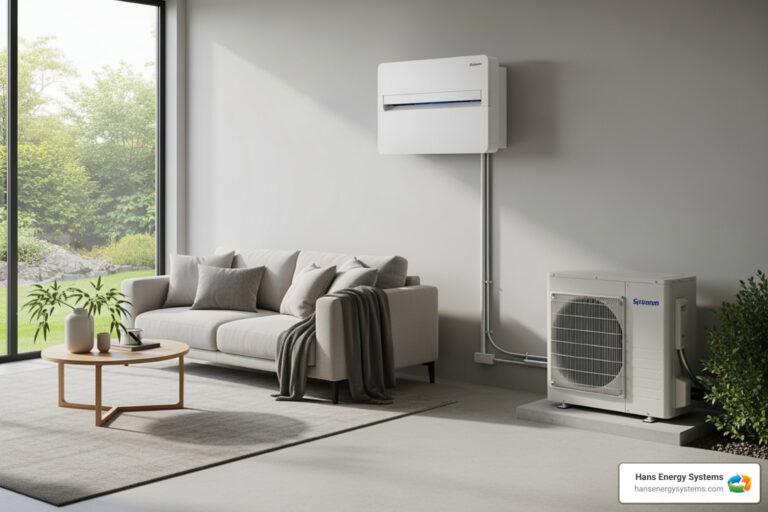
Ductless mini split installation has become one of the most popular HVAC solutions for Southern California homeowners looking to escape high energy bills and improve their home comfort. Unlike traditional central air systems that require extensive ductwork, these efficient heat pumps consist of just two main components: an indoor air handler and an outdoor condenser unit connected by refrigerant lines.
Key Steps in Ductless Mini Split Installation:
- Size your system – Calculate BTUs based on room square footage (typically 20-25 BTUs per sq ft)
- Choose locations – Indoor unit on exterior wall, outdoor unit with proper clearance
- Install mounting bracket – Secure to wall studs with proper leveling
- Drill access hole – 2-3 inch hole angled downward for drainage
- Mount indoor unit – Connect refrigerant lines and drain hose
- Install outdoor unit – On concrete pad or wall bracket
- Connect line sets – Flare connections and secure all joints
- Electrical work – Dedicated circuit installation (requires licensed electrician)
- System testing – Vacuum, charge, and test operation
The beauty of ductless systems lies in their zoned cooling and heating capabilities. Each indoor unit operates independently, allowing you to control temperatures room by room. This targeted approach can reduce energy consumption significantly compared to cooling your entire home when only certain rooms are occupied.
Modern mini split systems offer impressive energy efficiency with SEER ratings ranging from 17 to 42, well above the minimum requirement of 15. This translates to substantial savings on your monthly utility bills while providing reliable year-round comfort.
While DIY installation kits with pre-charged refrigerant lines are available, most installations require professional expertise for electrical connections, refrigerant handling, and compliance with local codes. Understanding the process helps you make informed decisions about your installation approach.

Pre-Installation: Planning and Preparation
Proper planning is the foundation for a successful ductless mini split installation and years of efficient comfort in your San Diego home.

The most crucial decision is sizing your unit correctly. An undersized unit won’t cool your space during hot San Diego summers, while an oversized one wastes money and cycles inefficiently.
A baseline BTU calculation is roughly 20-25 BTUs per square foot. For a 500-square-foot room, that’s about 17,500 BTUs. However, your home’s unique characteristics can significantly alter this estimate.
Room insulation greatly affects your needs. Floor-to-ceiling windows, high ceilings, poor insulation, or a room with intense afternoon sun all increase your BTU requirements.
This is where you choose between single-zone vs. multi-zone systems. A single-zone setup is perfect for a home addition or master suite. For individualized temperature control in multiple rooms, a multi-zone system connects several indoor units to one outdoor condenser.

Understanding the key components is also vital. The outdoor condensing unit, indoor air handler, refrigerant lines, condensate drain, and electrical wiring must all work in harmony for optimal performance.
Choosing the Right Location
The right location is critical for your ductless mini split installation, ensuring quiet operation and maximum efficiency.
For indoor unit placement, choose a wall with adequate wall strength to support the unit for 15-20 years. Mount it high on the wall, at least six feet from the floor, with proper airflow clearance (about 6 inches from the ceiling and walls) to let air circulate freely.
Pro tip: Choosing an exterior wall simplifies the installation. The proximity to outdoor unit is important because shorter, straighter runs for refrigerant lines, drain hoses, and electrical connections lead to a cleaner installation and better performance.
Your outdoor unit placement is equally important. Whether you choose a concrete ground pad or a wall bracket, the key is providing excellent ventilation. The condenser needs at least 24 inches of clearance on all sides to move air effectively.
Consider noise when selecting a spot. While modern units are quiet, avoid placing the condenser outside a bedroom window. The north or east side of a home often provides the best combination of accessibility and discretion.
Tools and Materials You’ll Need
A successful installation requires the right tools. Even with DIY-friendly kits, quality equipment is necessary to ensure a smooth process.
Your essential toolkit includes a drill, a 2-3 inch hole saw, a level (critical for drainage), various wrenches, screwdrivers, and safety glasses. A stud finder helps locate solid mounting points. For refrigerant connections, a torque wrench prevents leaks, and specialized flaring tools create proper line connections.
The materials list includes refrigerant lines, a line set cover to protect exterior connections, mounting brackets, and electrical components. Professional installations also require a vacuum pump and micron gauge to properly evacuate the refrigerant lines, removing air and moisture that could damage your system.
Gathering all tools and materials beforehand ensures a smooth installation and professional results for your San Diego home.
A Step-by-Step Guide to Ductless Mini Split Installation
With planning complete, it’s time for the ductless mini split installation. Understanding these steps is helpful whether you’re attempting a DIY project or hiring a professional, ensuring a smooth process.

Each piece must fit perfectly for the system to work efficiently. Modern mini splits are designed with homeowners in mind, making the installation more straightforward than you might expect.
Installing the Indoor Unit (Air Handler)
Properly mounting the indoor unit is crucial for performance and aesthetics.
Mounting the bracket is your foundation. Use a stud finder to locate wall studs, then drill pilot holes and secure the bracket with heavy-duty screws. Pro tip: Double-check that your bracket is perfectly level. Even a slight tilt can cause drainage problems and water damage.
Drilling the hole for your line set requires a 2- to 3-inch diameter hole. The secret is to angle it slightly downward toward the outside, creating a path for condensation to escape. To prevent damage to the exterior, many installers drill halfway from the inside and finish from the outside.
Running the line set involves carefully feeding the bundle of refrigerant lines, electrical wiring, and drain hose through the wall. Ensure the protective collar is in place to prevent damage from the hole’s rough edges.
Connecting the drain hose is a critical detail. Position this line below your other connections and maintain a gentle downward slope so gravity can ensure proper drainage.
Mounting the unit is the final step for the indoor unit. Lift it onto the bracket—most have a simple hook-and-hang design. Connect the control wires per the manufacturer’s instructions and ensure all lines pass cleanly through the wall.
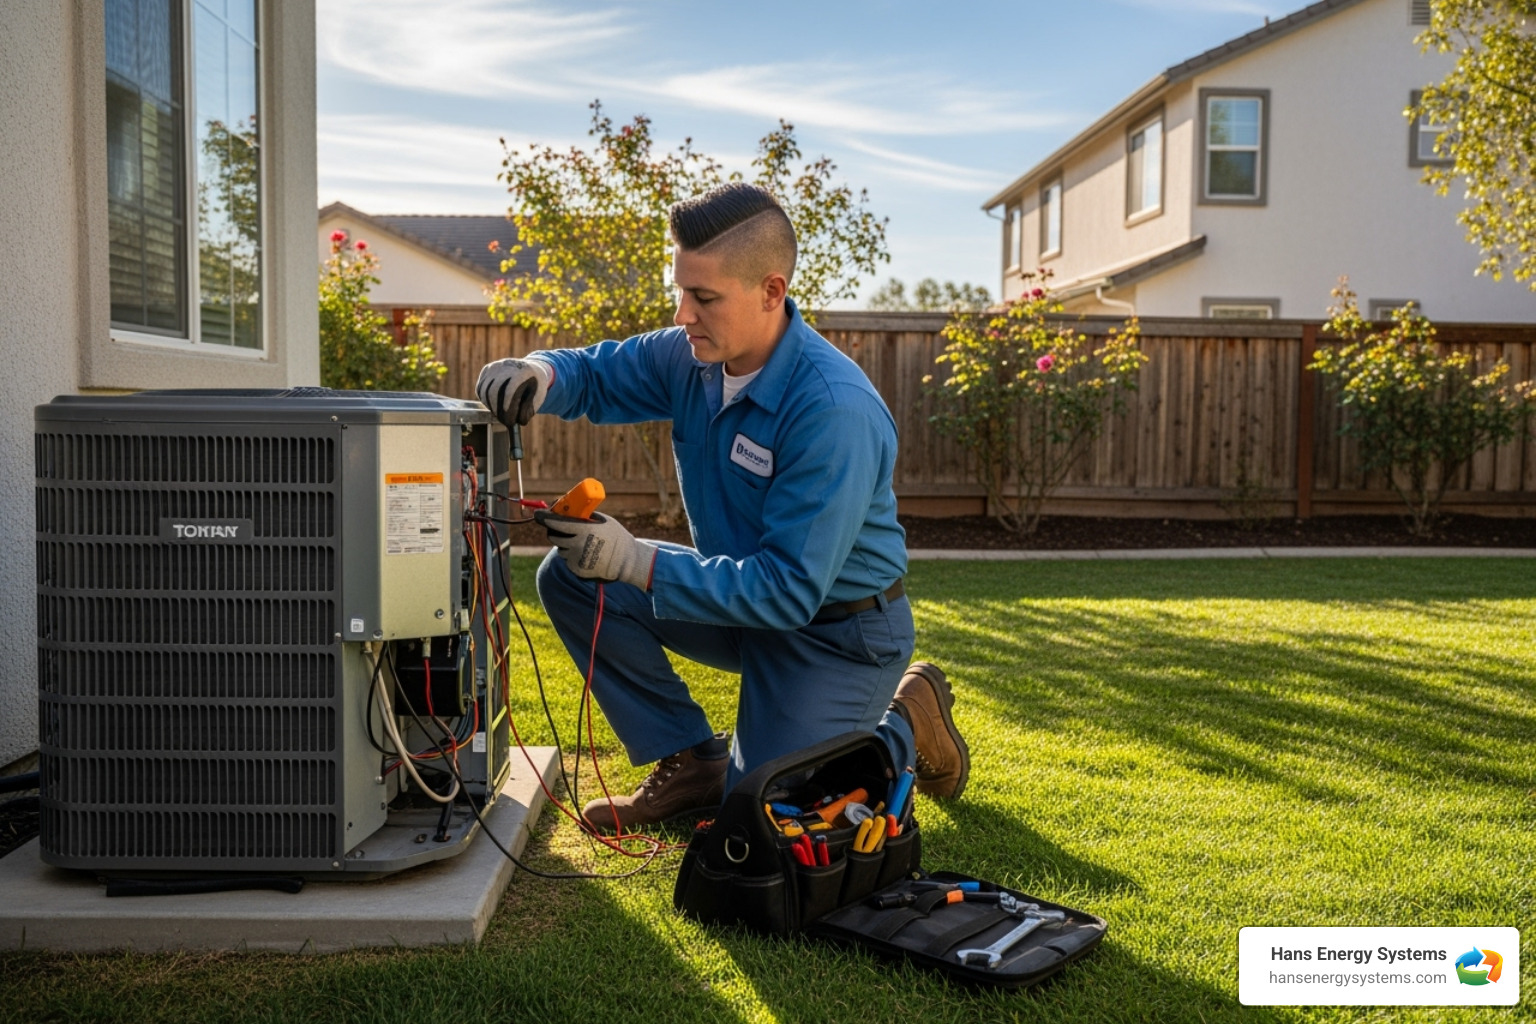
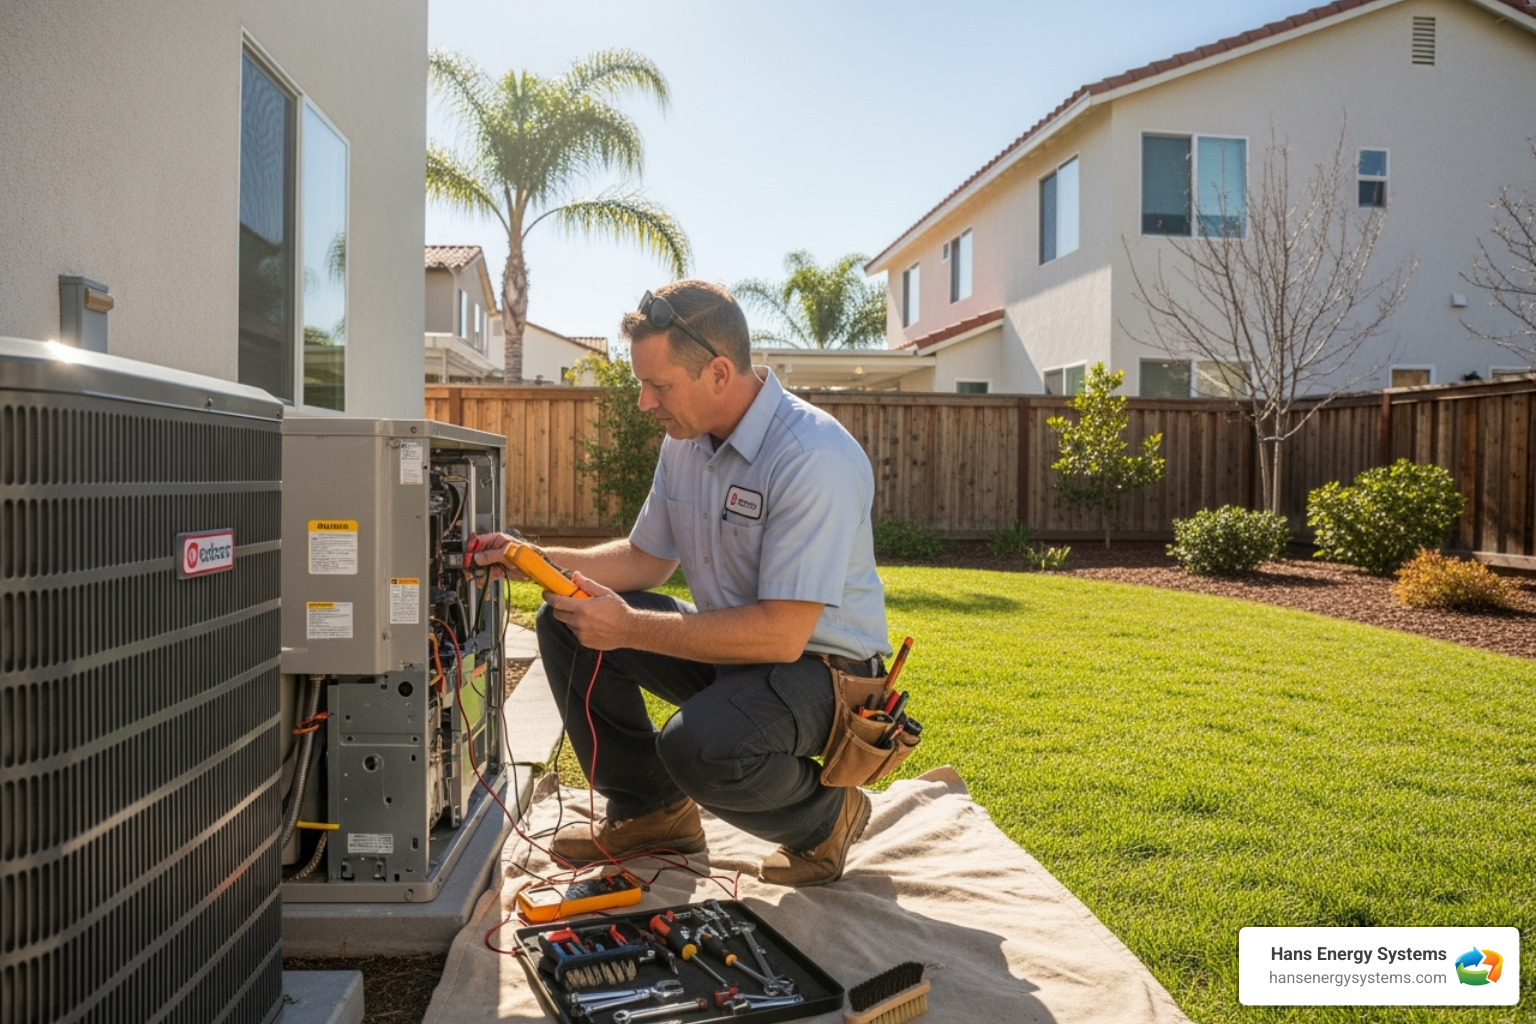
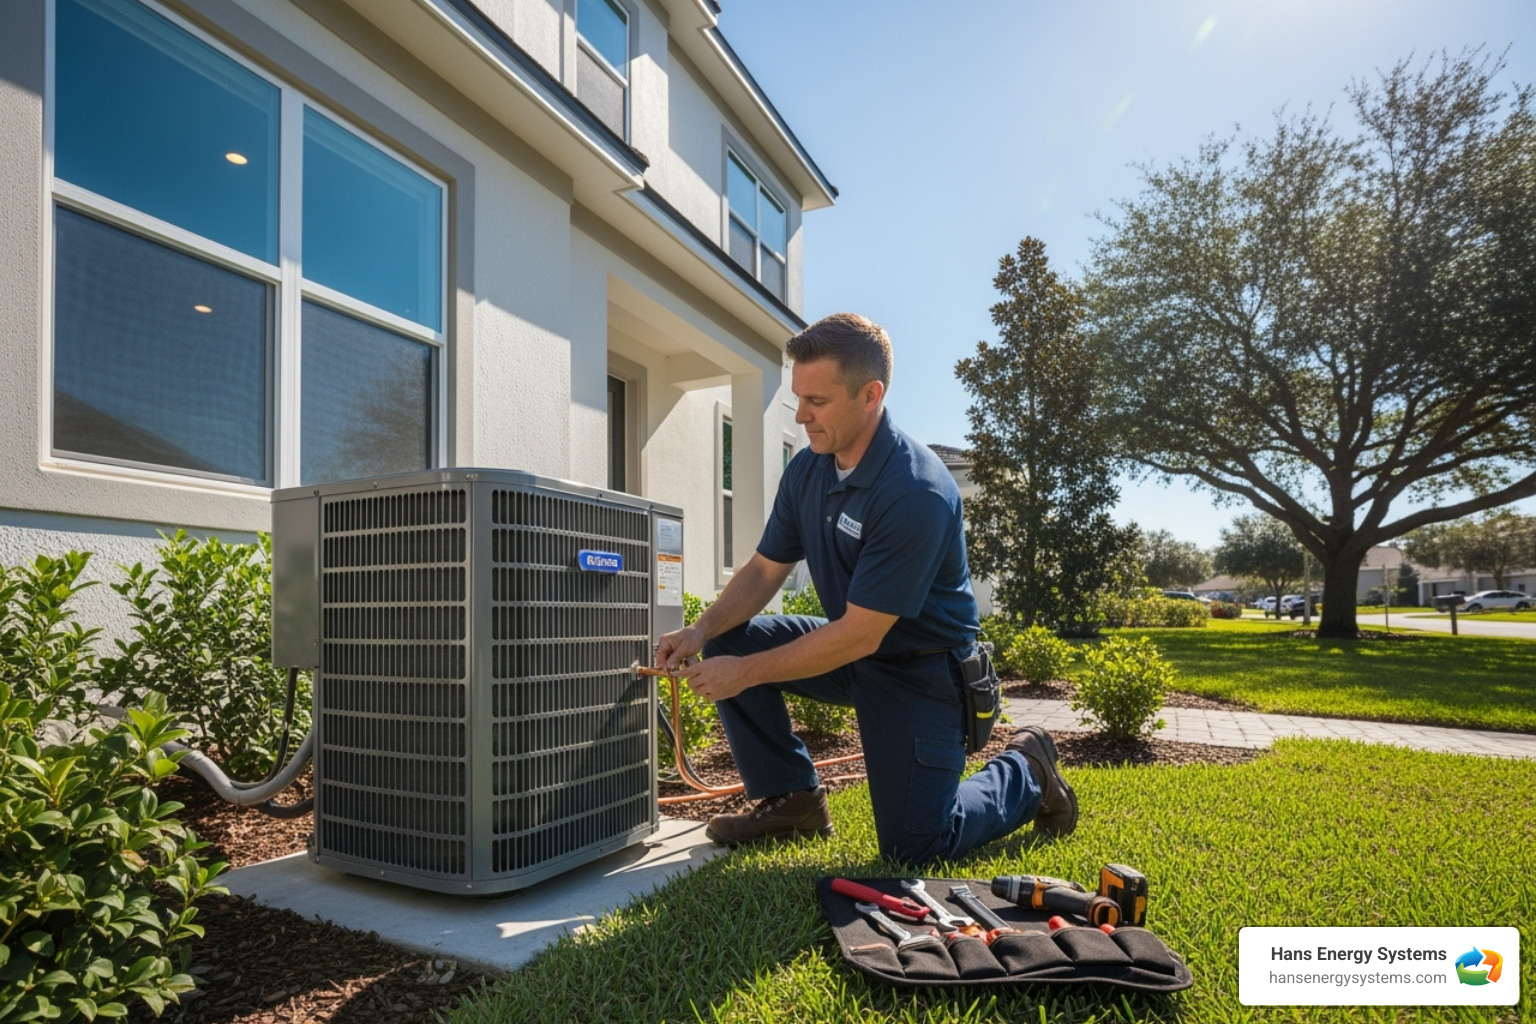
Installing the Outdoor Unit (Condenser)
The outdoor condenser handles the heavy lifting of heat exchange. Proper installation here ensures years of reliable operation.
Preparing the foundation starts with choosing a level, stable concrete pad for ground installation or secure wall brackets. If wall mounting, ensure the wall can handle the weight and vibration. Clear away any vegetation or debris, giving the unit at least 24 inches of clearance on all sides for airflow.
Securing the unit with the manufacturer’s recommended hardware prevents vibration, ensuring quieter operation and a longer lifespan.
Connecting the line set to the outdoor unit requires precision. Match the refrigerant lines to their ports on the condenser. Flaring connections properly is critical to prevent refrigerant leaks. This step requires specialized flaring tools and a torque wrench to tighten connections to the manufacturer’s specifications.
Connecting the drain line from the outdoor unit should also maintain a downward slope to prevent water from pooling.
Finally, install a line set cover to protect connections from weather and UV damage. This detail improves both system longevity and your home’s curb appeal.
While understanding this process is valuable, many steps like refrigerant handling, electrical work, and system testing require professional expertise for safety and optimal performance.
DIY vs. Professional Installation: What’s Right for You?
The big question that keeps many San Diego homeowners up at night: should you tackle that ductless mini split installation yourself, or call in the pros? It’s like deciding whether to cut your own hair – sure, you could do it, but the results might leave you with some serious regrets.

Let’s be honest – modern DIY mini split systems have come a long way. Those pre-charged linesets are a game-changer for single-room applications, eliminating one of the trickiest parts of installation. You don’t need to mess with refrigerant charging, which removes a major technical hurdle. But here’s the thing: even with these user-friendly kits, there’s still plenty that can go sideways.
Think about it this way – improper installation isn’t just about wasted money. We’re talking refrigerant leaks that harm the environment, systems that work poorly and waste energy, and warranties that become worthless pieces of paper. In sunny Southern California, where your cooling system works overtime, these mistakes can turn your comfort investment into a costly headache.
Now, if you’re looking at a traditional mini split system (not the pre-charged variety), we strongly recommend going professional. Refrigerant handling isn’t just technical – it’s dangerous. That stuff can cause severe burns if it escapes, and California has strict EPA regulations about who can handle it. Plus, most electrical work for these systems requires a licensed electrician anyway.
The benefits of professional installation go way beyond just following the rules. System performance and longevity depend heavily on getting everything just right the first time. Professionals know how to size your system perfectly, ensure proper refrigerant levels, and make connections that won’t fail you down the road. They’ve seen every weird wall situation and tricky installation challenge you can imagine.
Here’s something many homeowners don’t realize: most manufacturers will void your warranty if you don’t use professional installation. That’s their way of saying they know how easy it is to mess things up, even with the best intentions. Professional installers also understand the nuances of maximizing energy savings with ductless AC, ensuring your system operates at peak efficiency from day one.
Key Considerations for Your Ductless Mini Split Installation
Whether you’re leaning toward DIY or professional installation, understanding these technical requirements will help you make the right choice for your situation.
Electrical requirements are often more complex than homeowners expect. Most mini split systems need a dedicated circuit – that means they can’t share power with your bedroom outlets or kitchen appliances. Smaller units might run on standard 110-volt power, but many systems require 220 volts or higher with their own 15-20 amp breaker. This isn’t weekend warrior territory – you’ll need a licensed electrician for high-voltage connections and new circuit installation, especially here in San Diego County.
Local codes and permits are another crucial piece of the puzzle. Many counties require official inspections for HVAC installations, and there’s good reason for that. These inspections ensure your ductless mini split installation meets all safety and building standards. Skipping this step can create problems when you sell your home or file an insurance claim.
The most critical technical aspect is system vacuuming and charging. Before any refrigerant flows through your system, those lines need to be thoroughly evacuated using specialized vacuum pumps and micron gauges. This removes every trace of air and moisture – and we mean every trace. Professional installers often flush lines with nitrogen and vacuum them multiple times because even tiny amounts of moisture can cause corrosion and system failure.
For traditional systems, refrigerant charging requires precise measurement and adherence to strict EPA regulations. While DIY-friendly units come pre-charged, conventional systems need careful charging, especially with multiple indoor units or long line runs between indoor and outdoor components.
Common Mistakes to Avoid During Ductless Mini Split Installation
Even experienced DIYers can stumble when it comes to HVAC work. Here are the mistakes that cause the most headaches – and the ones we work hard to prevent in every ductless mini split installation.
Improper sizing tops our list of installation nightmares. Install a unit that’s too small, and you’ll never achieve comfortable temperatures. Go too large, and the system will cycle on and off constantly, wasting energy and potentially creating humidity problems. It’s like trying to fill a teacup with a fire hose – technically possible, but messy and inefficient.
Incorrect unit placement can kill your system’s performance before it even gets started. Block airflow around indoor units or squeeze outdoor units into tight spaces, and efficiency plummets. We’ve seen outdoor units crammed between bushes and walls where they can barely breathe – not exactly a recipe for success.
Poorly flared connections cause more refrigerant leaks than any other single factor. These connections must be perfectly formed with specialized flaring tools and tightened with torque wrenches to exact specifications. It’s precision work that requires both the right tools and plenty of experience.
Kinked refrigerant lines might look like a minor issue, but they can restrict flow and damage your entire system. These lines need to bend smoothly and gradually – sharp bends are system killers.
Improper drainage slope causes water backup, leading to leaks, mold growth, and the kind of uneven cooling issues that make summers miserable. That condensate drain line needs to slope continuously downward with no dips or level spots where water can pool.
The bottom line? While DIY installation might seem appealing, the technical complexity and potential consequences make professional installation the smart choice for most San Diego homeowners. Your comfort, safety, and wallet will thank you in the long run.
Post-Installation Care and Maintenance
Congratulations on your new ductless mini split installation! Now that you’re enjoying perfectly controlled comfort in your San Diego home, let’s talk about keeping that system running like a dream for years to come.
Here’s some great news: with proper care, your ductless mini split system can keep you comfortable for around twenty years. That’s typically five to ten years longer than traditional central AC systems! The key is staying on top of a few simple maintenance tasks that will keep your investment performing at its peak.
Cleaning filters is probably the most important thing you can do for your system. Those filters in your indoor units work hard to keep your air clean, but they need regular attention. During peak summer and winter months when your system is working overtime, check them monthly. A quick rinse with warm water or a gentle vacuum usually does the trick. Clean filters mean better airflow, improved indoor air quality, and lower energy bills.
Your cleaning coils deserve attention too, though not quite as frequently. Both the indoor and outdoor coils can accumulate dust, pollen, and debris that acts like a blanket, making your system work harder than necessary. A soft brush or compressed air can help remove buildup from the outdoor unit’s coils.
Checking the outdoor unit should become part of your seasonal routine. Walk around it and clear away any leaves, grass clippings, or debris that might have accumulated. 24-inch clearance we talked about during installation? Maintaining that space ensures your system can breathe properly. After storms or windy days, take a quick peek to make sure nothing has blown against the unit.
Debris removal is especially important here in San Diego County, where our beautiful landscaping can sometimes get a little too close for comfort. Trim back any bushes or plants that might be encroaching on your outdoor unit’s space.
The smartest thing you can do for your system is scheduling professional tune-ups with a qualified HVAC technician at least once a year. These check-ups catch small issues before they become expensive problems and can prevent frustrating situations like Why Your Ductless AC Freezes Up in Summer.
Think of maintenance like taking your car in for regular oil changes – a little attention now saves you from major headaches down the road. Your future self (and your wallet) will thank you for keeping up with these simple tasks.
Frequently Asked Questions about Mini Split Installation
We’ve helped countless San Diego County homeowners with their ductless mini split installation projects, and certain questions come up again and again. Let’s tackle the most common concerns we hear from folks just like you.
Do I need a mini split in every room?
This is probably our most popular question, and the answer might surprise you! You don’t need a mini split in every single room, but you will need an indoor unit in every space where you want independent temperature control. That’s the real magic of zoned comfort – you get to choose exactly which areas to heat and cool.
Think about it this way: if you have a three-bedroom home, you might install indoor units in the master bedroom, living room, and home office, all connected to one outdoor unit. The guest bedroom that rarely gets used? You can skip it entirely and save money. This targeted approach is what makes single-zone systems perfect for additions or specific problem areas, while multi-zone systems shine when you want to control temperatures in several key spaces.
The beauty is in the flexibility. You’re only heating and cooling the rooms you’re actually using, which translates to real energy savings on your monthly bills.
Can a mini split be controlled by a smart thermostat?
Absolutely, and this is where modern technology really shines! Most ductless mini split systems come with their own remote controls right out of the box, but the smart home integration options are pretty impressive these days.
Many newer models offer Wi-Fi connectivity built right in, letting you control your system through a smart HVAC app on your phone. You can adjust temperatures, set schedules, and monitor energy usage from anywhere. Some manufacturers offer cloud-based systems that integrate beautifully with your existing smart home setup.
If you prefer a traditional wall-mounted approach, you can often connect third-party smart thermostats like Ecobee to your mini split system. Just keep in mind that for multi-zone systems, each indoor unit typically needs its own thermostat for true independent control. It’s like having a personal climate assistant for every room!
How much clearance does a mini split need?
Proper clearance is absolutely critical for both performance and maintenance access – we can’t stress this enough! Getting this wrong is one of the fastest ways to reduce your system’s efficiency and lifespan.
For your indoor unit clearance, you’ll want at least 6 inches of space above and around the unit. This ensures proper airflow and prevents the unit from working harder than it needs to. We’ve seen too many installations where furniture or decorations block airflow, leading to poor performance and higher energy bills.
The outdoor unit clearance is even more important. Your outdoor condenser needs room to breathe! We recommend maintaining at least 24 inches of clearance around all sides, especially where air enters and exits the unit. This space serves double duty – it ensures optimal airflow requirements for heat exchange and gives our technicians easy access when it’s time for maintenance.
These are general guidelines, and your specific unit might have different requirements. Always check your manufacturer specifications in the installation manual, as some high-efficiency models might need even more space. When in doubt, more clearance is always better than less!
Ensure a Perfect Installation for Year-Round Comfort
After walking through every aspect of ductless mini split installation, it’s clear why these systems have become such a popular choice for San Diego County homeowners. The combination of energy efficiency, zoned cooling and heating, and year-round comfort makes them an excellent investment for your home’s comfort and your wallet.
The difference between a system that performs flawlessly for decades and one that struggles from day one often comes down to the quality of installation. Proper sizing and placement aren’t just recommendations—they’re the foundation of system performance. When your indoor unit is positioned for optimal airflow and your outdoor condenser has adequate clearance, you’re setting yourself up for consistent comfort and lower energy bills.
We’ve seen how the technical aspects of installation can be complex. From refrigerant line connections that require specialized flaring tools to electrical work that demands a licensed professional, many steps in the process benefit significantly from professional expertise. Even seemingly simple tasks like ensuring proper drainage slope can make the difference between a system that runs smoothly and one that develops issues down the road.
The beauty of understanding this process is that you can make informed decisions about your installation. Whether you’re considering a DIY approach with a pre-charged line set for a single room or planning a whole-home multi-zone system, knowing what’s involved helps you choose the right path for your situation.
At Hans Energy Systems, we’ve been helping homeowners throughout San Diego County experience the benefits of properly installed ductless mini split systems. Our team understands the unique challenges of our local climate and building codes, ensuring your installation meets all requirements while delivering the comfort and efficiency you expect.
Ready to enjoy the superior comfort and energy savings that come with a professionally installed ductless mini split system? We’re here to guide you through every step of the process, from initial sizing to final testing.