Why Solar Panel Glass Repair Matters for Your Investment
How to repair broken solar panel glass depends on the damage, but here are three main DIY methods:
Quick Repair Methods:
- Polyurethane/Epoxy Resin – Clean panel, mix resin, spread evenly, let cure 24+ hours
- Silicone Encapsulant – Apply clear silicone (like QSil 216) over cracks, cure 36+ hours
- Transparent Laminating Film – Wrap entire panel surface with heat gun and squeegee
Important: These are temporary fixes that may reduce efficiency. Severe damage requires professional replacement.
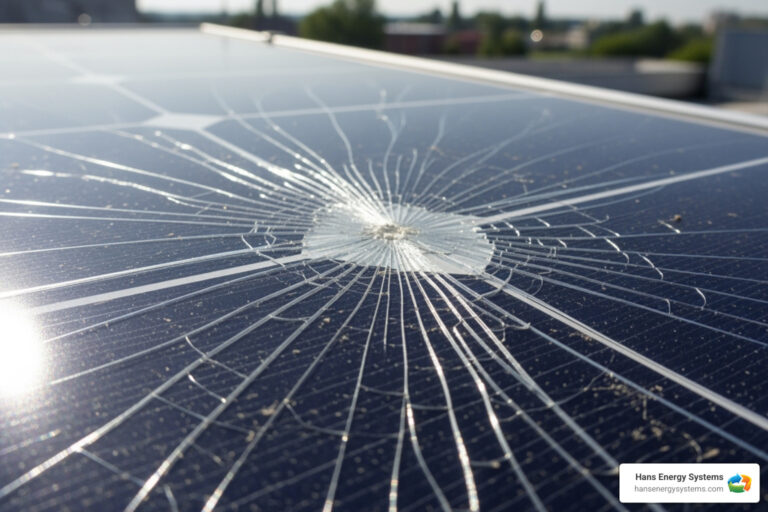
A crack in your solar panel glass doesn’t mean your investment is lost. Many cracked panels still function, and some damage is repairable. When damage from hail, debris, or thermal stress occurs, you must choose between repair and replacement.
Panels with cracked glass often continue producing power with minimal efficiency loss. One user reported their shattered panel “produces as much as other panels” even after years of harsh weather exposure.
However, broken glass allows moisture to enter and corrode internal components, and loose glass pieces pose safety risks. The key is knowing when to attempt a DIY repair versus when to call a professional.

Understanding the Damage: Causes and Risks of Broken Solar Panel Glass
Understanding what caused the damage to your solar panel is the first step toward an effective repair. Several factors can lead to cracked glass, each carrying significant risks if left unaddressed.

Common Causes of Broken Glass:
- Hail and Debris Impact: Large hailstones or flying debris from windstorms can cause direct impact damage. Even so, many panels continue producing power after taking a hit.
- Improper Installation or Pests: Incorrect mounting can create stress points, while pests like squirrels can chew wiring, weakening the system’s integrity over time.
- Thermal Cycling: The daily expansion and contraction from temperature changes is a constant stressor that can cause microcracks, the most common type of solar panel damage.
- Wind and Storms: High winds create pressure that can stress panel structures. It’s wise to protect solar panels from storm damage.
Why Broken Glass is a Serious Risk:
A crack is more than a cosmetic issue; it’s a breach in your system’s protection.
- Moisture Ingress and Corrosion: This is your biggest enemy. Water entering through cracks will corrode delicate internal electronics, leading to eventual failure.
- Reduced Efficiency: As moisture damage progresses, your panel’s performance will steadily decline, reducing your energy savings.
- Electrocution and Fire Hazard: Water mixing with live electrical components creates a severe electrocution hazard. It can also cause short circuits, which are a potential fire risk.
- Delamination: Moisture can cause the panel’s layers to separate, accelerating damage and leading to irreversible failure.
How to Repair Broken Solar Panel Glass: A Step-by-Step Guide
If you’ve decided on a DIY repair, the goal is to seal out moisture and secure loose glass. These methods are temporary solutions to extend a panel’s life, not permanent fixes. The main priority is creating a waterproof barrier to protect the panel’s internal components.

Method 1: Applying a Polyurethane or Epoxy Resin Sealant
This method creates a new, durable protective layer over the damaged glass. It’s more involved but can be highly effective.
- Materials: You will need clear, UV-stabilized polyurethane or epoxy resin, mixing tools, a squeegee, isopropyl alcohol, and safety gear (gloves, glasses, respirator).
- Preparation: Disconnect the panel from the system completely. This is a critical safety step. Thoroughly clean the surface with isopropyl alcohol to ensure the resin adheres properly. Lay the panel horizontally for even application.
- Application: Follow the resin’s mixing ratios precisely to avoid overheating. Mix gently to prevent air bubbles. Pour the resin onto the damaged area and spread it in a thin, even coat with a squeegee, ensuring it fills all cracks.
- Curing: Allow at least 24 hours to cure, depending on temperature and humidity. If applying a second coat of epoxy, do so while the first is still tacky (around 8-16 hours).
- Note: Polyurethane may peel over time, while epoxy is more durable but requires careful mixing. Expect a potential reduction in efficiency.
Method 2: Using a Silicone Encapsulant for a Flexible Fix
For smaller cracks, a clear silicone encapsulant like QSil 216 provides a flexible, rubber-like seal that accommodates the panel’s thermal expansion and contraction.
- Application: After thoroughly cleaning the damaged area, apply the clear silicone encapsulant directly over the cracks. Use a scraper to spread it smoothly and create a watertight seal.
- Curing: Be patient. Curing times can be much longer than advertised, often requiring 36 hours or more depending on temperature and humidity. Do not rush to reinstall the panel.
- Note: While highly flexible, silicone may not provide enough structural support for severely shattered glass.
Method 3: Sealing with a Transparent Laminating Film
Transparent laminating film, similar to car wrapping material, offers a quick and effective temporary seal, especially for securing loose glass pieces.
- Materials: You’ll need the transparent film, a heat gun, a squeegee, and a utility knife.
- Application: Clean the panel thoroughly. Apply the film from one end, using the heat gun to make it pliable and the squeegee to smooth out air bubbles. Work slowly and methodically. Wrap the film around the panel edges to create a waterproof seal.
- Note: This is an inexpensive temporary fix. While effective at waterproofing, it may not be aesthetically perfect or durable long-term.
For a visual guide, see How to Repair Solar Panel Broken Glass. These methods can extend the life of a damaged panel, but they are not permanent solutions.
Repair vs. Replace: Making the Smart Financial Decision
Deciding whether to repair or replace a cracked solar panel involves weighing costs, performance, and safety. While a DIY fix can save money, how to repair broken solar panel glass isn’t always the most cost-effective solution in the long run.
| Repair Method | Pros | Cons |
|---|---|---|
| Resin (Polyurethane/Epoxy) | – Creates a tough, clear, and durable seal. – Excellent moisture barrier. – Epoxy can be stronger than original glass. |
– Polyurethane may blister/peel over time. – Polyurethane may result in efficiency loss. – Epoxy requires careful mixing to prevent overheating. – Can be messy to apply. – May not be aesthetically perfect. |
| Silicone Encapsulant | – Forms a flexible, rubber-like, waterproof seal. – Excellent for protecting internal electronics from moisture. – Accommodates thermal expansion. |
– Can have significantly longer curing times than stated. – May not offer structural rigidity for shattered panels. – Primarily for sealing cracks, not rebuilding structure. |
| Transparent Laminating Film | – Inexpensive and quick DIY fix. – Effectively waterproofs the panel. – Secures loose glass pieces. – Does not block sunlight. |
– Generally considered a temporary solution. – Long-term durability is questionable. – Aesthetic imperfections (folds, bubbles) can occur. – Not suitable for panels with large missing glass shards. |
Cost and Performance Analysis
Professional repairs vary in cost, as seen in the Average solar panel repair cost, but often address electrical issues, not just glass. While DIY materials are inexpensive, consider that used, undamaged solar panels can be surprisingly affordable, sometimes costing less than a professional repair. A good DIY repair on minor damage may have little effect on efficiency, but extensive damage or poor materials will reduce output. The durability of repaired panels varies greatly.
If you’re in our service area, a Professional Solar Panel Inspection in Poway can help you assess the damage accurately.
When to Choose DIY Repair
A DIY approach makes sense for:
- Minor Damage: Sealing small chips, hairline cracks, and microcracks to prevent moisture entry.
- Budget Constraints: A temporary fix can buy you time to save for a proper replacement.
- Temporary Solutions: Use DIY repairs to keep your system running safely while you plan a permanent solution. These fixes are for waterproofing, not restoring a panel to new condition.
When to Call a Professional for Repair or Replacement
Some situations demand professional expertise. Call a pro if you see:
- Shattered Glass: Panels with spiderweb cracks or missing glass need replacement for structural integrity.
- Delamination: Separating layers indicate deep, unfixable problems.
- Significant Power Loss: This points to internal damage beyond a surface fix.
- Visible Water Damage: Once moisture is inside, corrosion is likely too extensive for a simple repair to be effective.
- Safety Concerns: Any signs of arcing, burning smells, or excessive heat require immediate professional attention.
- Warranty Considerations: Most DIY repairs void manufacturer warranties. Check your documents first, as a professional replacement might be covered.
For serious issues beyond DIY solutions, see How We Handle Solar Panel Repair in Poway.
Safety First: Essential Precautions for Solar Panel Repair
Before attempting to how to repair broken solar panel glass, you must prioritize safety. Damaged panels present electrical, chemical, and physical hazards.

- Electrical Safety: Always disconnect the panel from your system (shut off the inverter, open DC disconnects) before starting work. Cover the panel with a thick, opaque tarp to stop it from generating electricity. A damaged, wet panel is an extreme electrocution risk.
- Personal Protective Equipment (PPE): Wear heavy-duty, cut-resistant gloves and safety glasses or a face shield. Tempered glass shatters into many small, sharp pieces. Wear long sleeves and pants to protect your skin from glass and chemicals.
- Roof Safety: If working on a roof, use proper fall protection, including a harness, lanyard, and secure anchor points. Never work alone. If you are not comfortable with heights, call a professional.
- Chemical Safety: Work in a well-ventilated area, preferably outdoors, when using resins or sealants. Wear nitrile gloves for chemical resistance and a respirator if fumes are strong. Always follow the manufacturer’s safety instructions.
If you are uncertain about any of these safety steps, do not proceed. Your safety is more important than any potential savings from a DIY repair.
Frequently Asked Questions about Solar Panel Glass Repair
Here are answers to common questions about how to repair broken solar panel glass.
Can a solar panel with broken glass still work?
Yes, a panel with broken glass can often still produce power. The solar cells underneath may be undamaged. However, it is not a safe or long-term solution. The primary risks are moisture damage leading to corrosion and eventual failure, and safety hazards from exposed electrical components, which create a serious shock risk.
Will a DIY repair affect my solar panel’s warranty?
Almost certainly, yes. Most manufacturer warranties are voided by unauthorized modifications or repairs. Always check your warranty documents before starting any DIY work. If the damage is covered, you may be eligible for a free professional replacement, which is a far better option.
How much efficiency is lost after a repair?
The efficiency loss depends on the extent of the damage and the quality of the repair.
- Minor Damage: A good repair on small cracks using a clear, UV-stable sealant may result in negligible efficiency loss.
- Extensive Damage: Opaque materials, a thick application, or repairs on heavily shattered glass will reduce output.
- Long-Term: DIY repairs may degrade, yellow, or peel under constant UV exposure, gradually reducing efficiency over time.
Conclusion
Finding broken glass on a solar panel is concerning, but it doesn’t always mean a total loss. The key risks are not immediate power failure, but moisture ingress leading to corrosion and serious safety hazards.
For how to repair broken solar panel glass, we’ve covered three DIY methods: polyurethane/epoxy resin, silicone encapsulant, and transparent laminating film. These are temporary fixes best suited for minor cracks and chips to seal out moisture and buy you time.
However, for shattered glass, significant power loss, or delamination, professional replacement is the safer and more reliable option. Always consider that DIY repairs will likely void your warranty. The right choice depends on the damage severity, your budget, and your comfort with the safety precautions.
At Hans Energy Systems, we’ve seen it all when it comes to solar panel damage across San Diego County. We know how important your solar investment is. Whether you’re weighing a DIY fix or dealing with damage that’s clearly beyond a home repair, we’re here to help you make the smartest choice.
Your solar panels work hard to power your home. Don’t let a crack dim those savings. Contact us for a professional solar panel repair assessment and let’s find the best path forward for your specific situation.